


Advanced Bridge and Soundpost Placement
Proper placement of the bridge is extremely important in the playability, tone, and structural integrity of your violin, viola, or cello. While your instrument may have been well setup when it was first sold to you (particularly if you bought from StringWorks!), the ravages of time and use can easily nudge the bridge out of place, and if you do not know what the right place is for the bridge, this tutorial may help you. While each instrument is different, this guide is quite accurate for most instruments. Cellos can often be found with greater variance than violins and violas, so if you are uncertain, contact your local luthier or the company from which you purchased your instrument for their advice - we are always happy to help.
The bridge feet should be lined up in a straight plane with the interior f-hole notches. (fig. 1) The f-hole notches are the slight wedges cut out of the f-hole on either side in the middle section. When you need to move your bridge, be very careful so as not to allow it to snap down and strike your instrument top - use both hands at all times, holding the instrument between your legs or on a padded clamp, and be firm yet very controlled about your actions and movements. Grip the bridge firmly with as many fingers as you can fit on it, and make small, controlled movements. You will likely get the hang of it after a short time, but if you feel uncomfortable at all, allow your teacher or an experienced colleague to assist you.

Soundpost
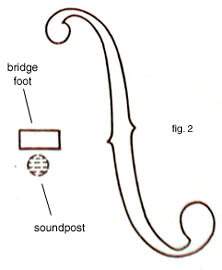 Also, note the position of your soundpost relative to your bridge and f-hole notches. (You can see your soundpost by looking in the treble f-hole - the f-hole on the right side as you look at the face of the instrument, scroll to the ceiling) The soundpost is often about 3.5-5mm (violins and violas) up to about 15-20mm (cellos) away from the back side of the bridge foot, but the exact position depends on the setup of your instrument and the luthier who performed the fitting. (fig. 2) Simply check to see that your instrument´s soundpost is not vastly further from the bridge foot than these figures, and if it is quite far from the bridge foot, take it to a qualified luthier for proper setting - do not attempt to adjust the soundpost unless you are absolute certain of your abilities and have the proper tools.
(again, note the straight plane from the inner f-hole notches through the bridge foot)
Is your bridge warped, or just leaning?
When moving your bridge or changing strings, it is very common for the bridge to lean forward (toward the fingerboard) and this is damaging to the bridge if left too long as the hard maple can begin to warp permanently. Check to be sure there is a perfect right angle at the back side of the bridge to the instrument table (top) and if not, move the bridge with both hands, pressing firmly but carefully near the top of the bridge while holding the instrument between your legs or in a padded clamp, and nudge it into the correct position. (fig. 3) As with all bridge work, if you do not feel comfortable performing the operation yourself, have a teacher or experienced colleague do it for you.

Updated 8/31/21